
Blog
How to Snag a New Build Home
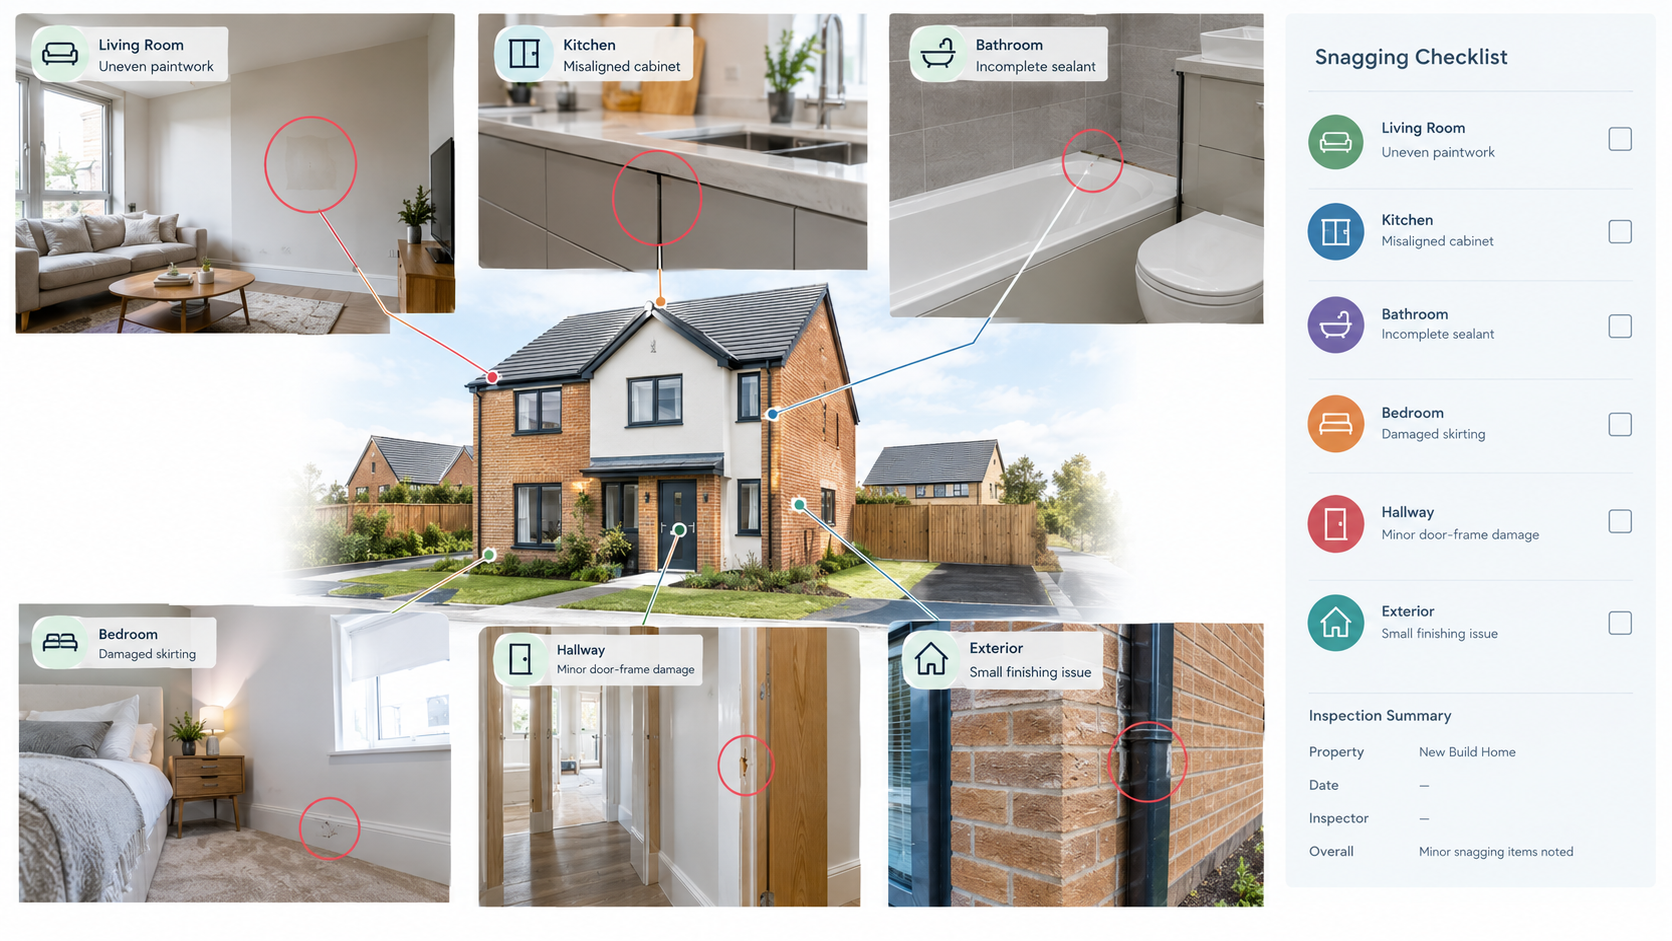
Buying a new-build home does not mean every detail will be finished perfectly on the day you receive the keys. Minor finishing defects, incomplete work, damaged fittings and installation issues can occur during construction and the final stages of handover.
Snagging is the process of inspecting the property, identifying those issues and recording them so they can be reported and followed up.
A new build snagging checklist gives you a structured way to inspect the property rather than relying on memory or looking only for obvious problems.
The most useful approach is to work methodically through the home, record each issue with a clear description and photograph, note its exact location, and keep a record of what has been reported and what remains outstanding.
What is new build snagging?
New build snagging is the process of inspecting a newly built or newly completed home to identify visible defects, incomplete work, damage and finishing issues.
Common examples include:
- Scratched or chipped doors
- Uneven paintwork
- Damaged skirting
- Chipped tiles
- Poorly finished sealant
- Loose handles
- Misaligned fittings
- Gaps around fixtures
- Damaged flooring
- Incomplete finishes
- Items requiring further investigation
The purpose of a snagging inspection is to identify observable issues clearly so they can be reported and addressed. It is not necessary to diagnose the cause of every issue during the inspection.
When should you snag a new build home?
Inspect the property as early as practical when access is available, and consider more than one inspection opportunity.
- Inspect before completion or handover where access is available.
- Record visible defects and incomplete work.
- Report the snags using the house builder’s agreed process.
- Keep your own copy of the snagging list and evidence.
- Reinspect after remedial work.
- Keep a record of remaining issues.
A new-build home can change between inspections as construction and finishing work continues, so snagging should be treated as a process rather than a single walkaround.
What should you take to a new build snagging inspection?
- Smartphone or camera
- New build snagging checklist
- Notebook or digital inspection app
- Torch
- Charger or power bank
- Tape measure where useful
- Small level where useful
- Pen or pencil
- Relevant room plans or property information
- Builder handover information
You do not need specialist equipment to identify many common finishing defects. Careful observation, clear notes and good photographs are often the most useful tools.
How to snag a new build home step by step
Use a consistent workflow:
Inspect → Photograph → Locate → Describe → Report → Reinspect → Record resolution
Work room by room and use the same basic checklist for each area.
New build snagging checklist: exterior
Where the exterior is accessible and safe to inspect, check:
- External walls, brickwork or render
- Pointing and mortar joints
- Cladding where applicable
- Windows and frames
- External doors and thresholds
- Gutters, downpipes, fascias and soffits
- External lights and sockets
- Drain covers
- Paths, driveway, patio and steps
- Fences and gates
- Garden areas and external tap
- Garage or storage areas
Look for visible damage, cracks, uneven finishes, missing components, poor junctions, damaged frames, gaps and incomplete landscaping. Do not attempt to access unsafe roof areas or carry out checks that require specialist equipment or create a fall or electrical risk.
Check external doors and windows
Open and close each accessible window and external door. Check operation, handles and locks, frames, glazing, seals, alignment, visible scratches or chips, trickle vents and restrictors where fitted. Photograph visible damage and record the exact window or door location.
New build snagging checklist: entrance and hallway
Inspect the front door, door frame, locks and handles, threshold, walls, ceiling, flooring, skirting, architraves, light switches, sockets, alarms where fitted, radiators and heating controls.
Look closely at corners, junctions and transitions. Entrance areas can be affected by construction traffic, so check for scuffs, chips, dents and incomplete finishes.
New build snagging checklist: living room
Walls and ceiling
Look for uneven paint, visible marks, cracks, poorly finished corners, gaps around fittings, damage, patch repairs and inconsistent finishes.
Flooring
Check for scratches, chips, gaps, damaged boards or tiles, uneven transitions and poorly finished edges.
Doors, windows and electrical fittings
Check operation, handles, locks, frames, glass, seals, alignment and visible damage. Inspect accessible switches, sockets and fittings for damage, looseness, misalignment, missing accessories or obvious operational problems. Do not remove electrical accessories or attempt electrical repairs yourself.
New build snagging checklist: kitchen
Check cabinet doors, drawers, handles, worktops, upstands, splashbacks, sealant, tiling, flooring, walls and ceiling, sink, taps, waste fittings, appliances, extractor or ventilation, sockets, lighting, plinths and end panels.
Open every accessible cupboard and drawer. Look for scratches, chips, misalignment, damaged worktops, loose handles, gaps, poorly finished sealant and damage around appliances. Where appliances are supplied, follow the builder’s or manufacturer’s instructions for safe functional checks.
New build snagging checklist: bathrooms and en-suites
Check the toilet, basin, taps, shower, bath, shower tray, screens, mirrors and cabinets, tiles, grout, silicone sealant, flooring, walls and ceiling, extractor or ventilation, radiator or heated towel rail, doors, handles and other fixtures and fittings.
Look for chipped or cracked tiles, incomplete grout, gaps in sealant, damaged sanitaryware, scratched fittings, loose accessories, poorly aligned doors and visible gaps.
Check silicone and sealant
Inspect sealant around baths, shower trays, basins, worktops, splashbacks, windows and other wet-area junctions. Look for gaps, incomplete sections, uneven application, detached sections or visible damage. A photograph can make the exact location of a sealant defect easier to communicate.
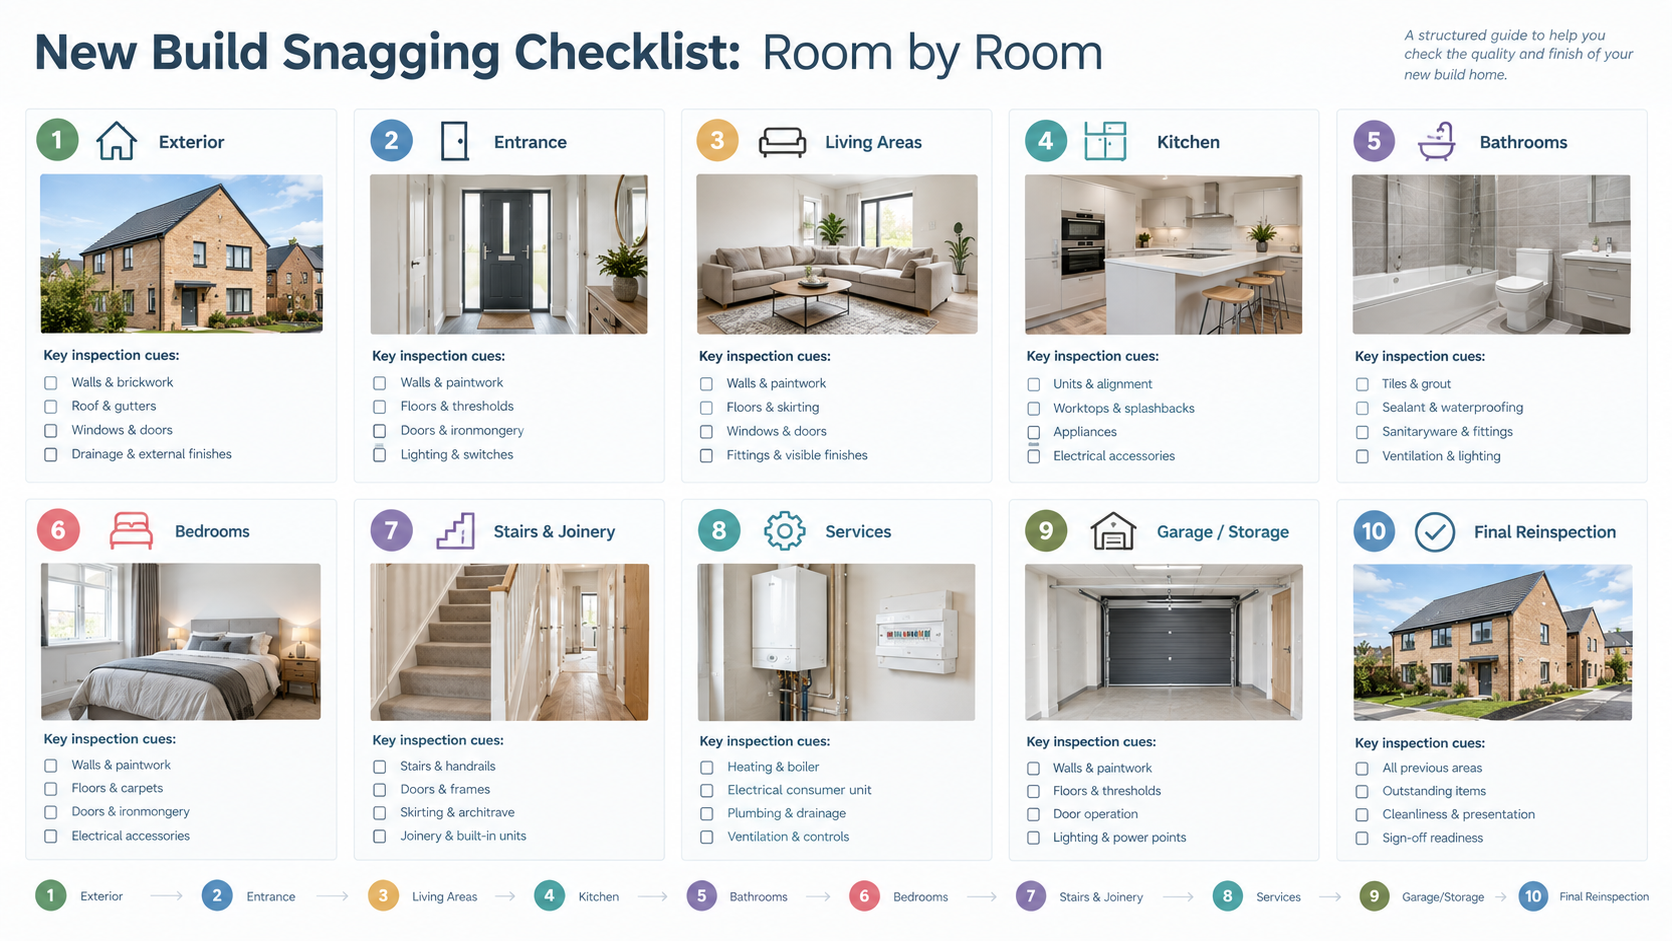
Work through the new build snagging checklist room by room, including the exterior and final reinspection.
New build snagging checklist: bedrooms
Inspect every bedroom individually. Check walls, ceiling, flooring, skirting, architraves, doors, handles, windows, sockets, light switches, radiators and built-in wardrobes where provided.
Look for paint defects, scratches, chips, gaps, misalignment, damaged fittings and incomplete finishes. Always record the room name or number with each issue.
New build snagging checklist: stairs and joinery
If the property has stairs, inspect treads, risers, handrails, balustrades, newel posts, spindles, wall junctions, paintwork and carpentry finishes.
Look for damage, scratches, gaps, loose visible components, uneven finishes and incomplete decoration. Do not carry out tests or adjustments that could create a safety risk.
New build snagging checklist: loft, garage and storage
Where these areas are accessible and safe, look for incomplete finishes, visible damage, doors and locks, lighting, sockets, storage fittings, flooring or boarding where provided, visible insulation, signs of staining or damage, and missing covers or fittings.
Only inspect what can be safely viewed. Do not disturb insulation, services or building components simply to investigate a possible issue.
New build snagging checklist: heating, ventilation and services
Check the visible and user-accessible parts of heating controls, radiators, thermostats, ventilation fans, extractor systems, accessible pipework, hot-water controls and service cupboards.
Look for damage, loose visible fittings, missing covers, poor finishing around penetrations and controls that do not appear to operate as expected. Follow the builder’s handover information for functional checks. If a system appears faulty, record the symptom rather than attempting a repair.
New build snagging checklist: electrical
Inspect accessible light switches, sockets, USB or data outlets where fitted, light fittings, external sockets, extractor controls, doorbells and supplied accessories.
Look for cracked faceplates, scratches, loose visible fittings, misalignment, poor finishing, missing accessories and items that do not appear to operate as expected. Do not remove covers, expose wiring or carry out electrical repairs. Report suspected electrical issues through the appropriate route.
How to photograph new build defects
Good photographs make a snagging list easier to understand. For many issues, take:
- A wider context photograph
- A close-up photograph
For example, a close-up can show a chipped tile while a wider image identifies the bathroom and wall. Where useful, add a simple circle, arrow or marker to identify the affected area.
Do not rely on photographs alone. Pair them with a written description and precise location.
What makes a good snagging description?
A useful description should tell the builder what was observed and where.
Weak: “Wall problem.”
Better: “Uneven paint finish approximately 600mm wide on the living-room wall beside the internal door.”
If the cause is uncertain, describe the condition rather than guessing. For example: “Visible staining below bedroom window. Investigate source and confirm appropriate remedial action.”
How to record a new build snagging list
A useful snagging record can include:
- Issue reference
- Room or location
- Date identified
- Description
- Photograph
- Required action
- Responsible party where known
- Status
- Follow-up date
- Verification notes
A simple status workflow is:
Open → Reported → In Progress → Ready for Inspection → Resolved
This separates a reported issue from one that has actually been checked after repair.
Example snagging record
Issue: Chip to lower-left corner of kitchen worktop beside hob.
Location: Kitchen, east worktop run, immediately left of hob.
Evidence: Context photograph and close-up photograph.
Action: Repair or replace damaged section through the builder’s agreed remedial process.
Status: Reported.
DIY snagging vs professional snagging inspection
Many homeowners can identify obvious finishing defects themselves. A DIY snagging inspection can be useful because the homeowner can inspect the property carefully and return to areas more than once.
A professional snagging inspection can provide additional independent inspection experience and structured documentation. A professional may be able to identify a broader range of observable defects, inspect systematically and produce a professional snagging report.
The approaches do not have to be mutually exclusive. A homeowner can carry out their own inspection and still choose a professional snagging inspection for additional support.
How to report snags to your house builder
Use the house builder’s agreed reporting process. Include a clear description, exact location, photograph, date, issue reference and required action where appropriate.
Avoid sending a collection of unlabelled photographs without descriptions or locations. Keep copies of submitted records and subsequent updates so you can see which items have been addressed and which remain outstanding.
How to keep track of outstanding new build snags
Your process should continue after the initial inspection. Track open issues, reported issues, repairs in progress, issues ready for reinspection, resolved issues and issues requiring further investigation.
When the builder says an issue has been fixed, inspect the result where practical.
Original issue: Visible gap in sealant around shower tray.
Reported repair: Sealant replaced.
Verification: Area reinspected; sealant appears continuous around the accessible perimeter.
Keep the original issue rather than deleting it when it is reported as fixed.
Common new build snagging mistakes
- Only looking for major defects: Small finishing problems can also be worth recording. Inspect systematically.
- Forgetting locations: “Scratch on door” is less useful than “scratch on inside face of bedroom 2 door.”
- Taking only close-up photos: A close-up can show the defect but not its location. Use context photographs where useful.
- Assuming one room represents the whole house: Inspect every relevant room.
- Relying on memory: Record issues during the inspection rather than recreating the list later.
- Guessing the cause: Record what you can see. If the cause needs investigation, state that.
- Closing a snag without checking it: A reported repair is not necessarily a verified repair.
- Losing the evidence: Keep original photographs, descriptions and records for follow-up.
How to make a new build snagging inspection more efficient
Work room by room
Complete one room before moving to the next.
Inspect from top to bottom
Start with ceilings and upper surfaces, then walls, joinery, fittings and floors.
Use the same checklist every time
A consistent new build inspection checklist reduces the chance of missing an area.
Photograph as you go
Do not leave all photography until the end.
Use precise locations
Room names, wall positions and fixture descriptions make follow-up easier.
Track status and reinspect
Keep a record of what has been reported, repaired and verified. A second inspection can identify remaining issues after remedial work.
Printable new build snagging checklist
Whole property
- Walls inspected
- Ceilings inspected
- Floors inspected
- Skirting inspected
- Architraves inspected
- Internal doors inspected
- Windows inspected
- Switches and sockets inspected
- Heating controls inspected
- Visible fittings inspected
Kitchen
- Cabinet doors
- Drawers
- Handles
- Worktops
- Splashbacks
- Sealant
- Sink and taps
- Appliances
- Flooring
- Sockets and lighting
- Plinths
Bathrooms
- Toilet
- Basin and taps
- Bath or shower
- Shower tray and screen
- Tiles and grout
- Sealant
- Flooring
- Ventilation
- Fittings
Bedrooms and living areas
- Walls and ceilings
- Flooring and skirting
- Doors and windows
- Sockets and switches
- Radiators
- Built-in storage
Exterior
- External walls
- Windows and external doors
- Gutters and downpipes
- External fittings
- Paths, driveway and patio
- Fencing and gates
- Garden
- Garage or storage
Documentation
- Every snag has a location
- Useful photographs attached
- Descriptions are clear
- Builder reporting process followed
- Copies retained
- Outstanding issues tracked
- Repairs reinspected
- Resolved issues recorded
How Site Audit & Plan can support new build snagging
A structured digital inspection workflow can help keep snagging information organised.
Site Audit & Plan supports issue capture through iOS and Android mobile apps, with a web app for managing information outside the inspection. Users can capture photographs and annotations, mark issue locations, collaborate with team members, track issues through to completion and generate professional PDF and XLSX/Excel reports.
The value of a digital workflow is the connection between the original observation and the final record. Instead of keeping photographs in one place and notes somewhere else, inspection information can be organised around individual issues and their locations. Offline functionality can also support inspections where internet access is limited.
The right approach depends on the homeowner’s needs and the complexity of the inspection. For repeated or professional snagging work, a structured digital process can make inspection records easier to maintain.
Frequently asked questions
What is new build snagging?
New build snagging is the process of inspecting a newly built home to identify visible defects, incomplete work, damage and finishing issues, then recording and reporting those issues for follow-up.
When should I snag a new build home?
Inspect as early as practical when access is available, and consider reinspecting after remedial work. A property can change as construction and finishing work continues.
What should I look for when snagging a new build?
Inspect walls, ceilings, floors, doors, windows, kitchen fittings, bathrooms, electrical accessories, heating and ventilation controls, joinery, storage and accessible exterior areas. Look for damage, incomplete work, poor finishes and misalignment.
Can I snag a new build home myself?
Yes. A homeowner can carry out a systematic DIY snagging inspection using a checklist, smartphone and careful observation. Some homeowners also choose a professional snagging inspection for additional independent support.
Should I photograph every snag?
Photographs are highly useful for many snags, particularly where the issue could be difficult to locate or explain later. A context photograph and close-up can work well together.
What should I include in a new build snagging checklist?
Include each room and relevant exterior area, plus walls, ceilings, floors, doors, windows, fittings, kitchen, bathrooms, electrical accessories, heating and ventilation, joinery and external areas. Include space to record photographs, locations, descriptions and status.
How do I report snags to my house builder?
Follow the builder’s agreed reporting process and provide a clear description, exact location, photographs and relevant issue reference. Keep a copy of what you submit and track subsequent updates.
Should I keep a record of resolved snags?
Yes. Keeping the original issue and recording the remedial outcome provides a clearer inspection history than deleting issues once they have been reported as fixed.
What if I do not know what is causing a defect?
Describe the visible condition and state that further investigation is required. Avoid presenting an unverified cause as fact.
Final takeaway
Learning how to snag a new build home is mainly about being systematic.
Use a new build snagging checklist. Inspect each room and accessible external area carefully. Photograph defects with enough context to identify them later. Record exact locations and describe what you can actually see. Report issues through the builder’s agreed process and keep your own records.
Do not treat the first inspection as the end of the process. Track outstanding snags, reinspect remedial work and keep a record of what has been resolved.
A clear snagging process gives you a practical record of the condition you observed and the issues that need to be addressed.