
Blog
The Site Manager's Guide to Construction Inspections
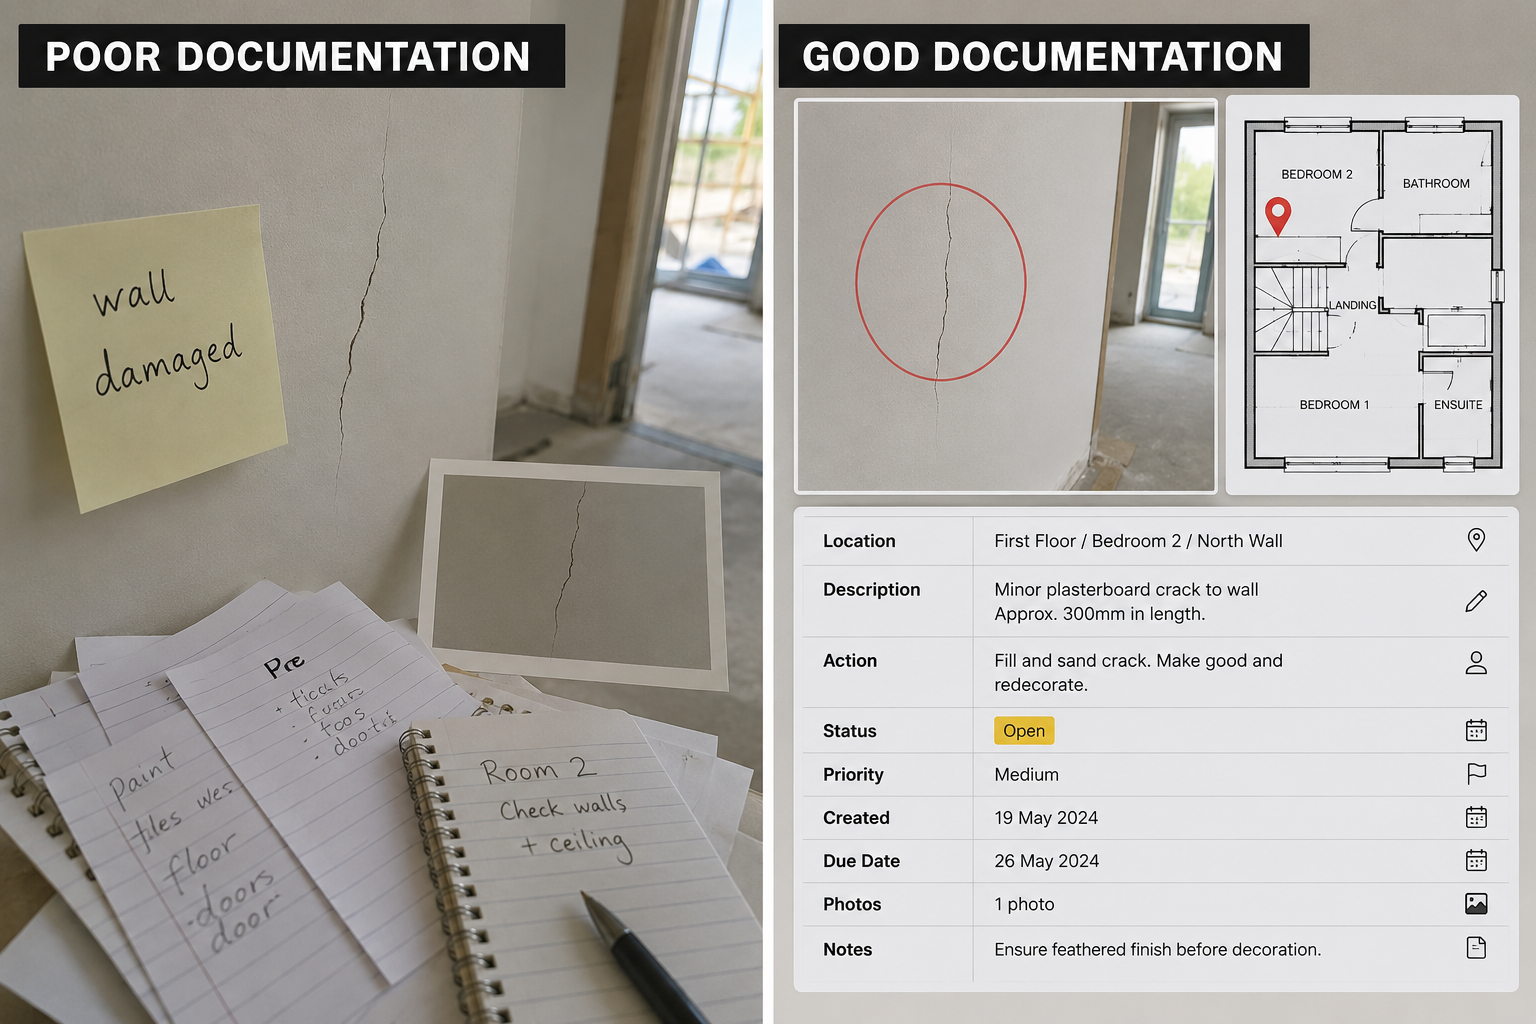
A site inspection is only useful if the findings are clear enough to act on.
For a site manager, that means more than walking the project, spotting defects and writing a few notes. A good construction inspection should establish what was checked, what was found, exactly where the issue is, who needs to deal with it, and whether it has actually been resolved.
That becomes harder when inspections are managed across notebooks, photographs, spreadsheets, messages and separate reports.
This guide explains a practical site inspection process for construction teams, including what to check, how to record findings, how to manage issues after the inspection, and when a digital inspection workflow can make the job easier.
What is a construction site inspection?
A construction site inspection is a structured check of work, conditions, quality and outstanding issues on a construction site.
The exact scope depends on the project and the purpose of the inspection. A site manager might inspect:
- Workmanship and installation quality
- Progress against the programme
- Previously identified defects
- Materials and finishes
- Doors, windows and other installed elements
- Electrical, plumbing or mechanical work
- Access, housekeeping and site conditions
- Areas approaching handover
- Outstanding issues assigned to subcontractors
The key is to make the inspection repeatable. If different people inspect the same area in completely different ways, findings become harder to compare and manage.
Why site inspections matter
Regular inspections give site teams an opportunity to identify problems before they become more difficult or expensive to resolve.
They also create a record of what was observed at a particular point in the project.
For a small construction company, a consistent inspection process can help answer practical questions such as:
- What has been checked?
- What defects or issues were found?
- Where exactly are they?
- Which trade is responsible?
- What is still outstanding?
- Has the issue been fixed?
- What evidence supports the closeout?
The inspection itself is only one part of the workflow. The real value comes from what happens to the findings afterwards.
A practical site inspection process
A useful site inspection process can be broken into seven stages:
- Prepare
- Inspect
- Record
- Photograph
- Locate and assign
- Follow up
- Verify and report
Each stage should produce information that makes the next stage easier.
1. Prepare before going on site
Start by deciding what the inspection needs to achieve.
Review previous inspection records and outstanding issues where available. Identify the areas, trades or work packages that need attention and make sure you have the relevant drawings, plans, specifications or checklists.
For a repeat inspection, do not simply start from scratch. Previous findings should help determine where to concentrate effort.
A simple site inspection checklist might include:
- Project and inspection date
- Area or floor being inspected
- Work package or trade
- Items to be checked
- Previously reported issues
- New defects or observations
- Photographic evidence
- Responsible person or trade
- Required action
- Status
- Follow-up date
The checklist should support the inspection rather than turn into paperwork for its own sake.
2. Inspect systematically
Walk the site in a consistent order.
For example, inspect a floor room by room rather than moving randomly between areas. On a larger project, divide the inspection into zones, levels or work packages.
Look at both the overall condition and the details.
A site manager checking a newly completed room might consider:
- Are finishes complete?
- Are surfaces damaged or poorly finished?
- Are doors aligned and operating correctly?
- Are fixtures securely installed?
- Are joints, sealants and interfaces finished properly?
- Is there evidence of damage from subsequent trades?
- Are previously recorded defects still outstanding?
A consistent route reduces the chance of skipping an area.
What should you record during a site inspection?
Avoid vague descriptions.
A note such as “wall damaged” may be difficult for another person to act on. A useful inspection record identifies the location, problem and required action.
For example:
“450mm vertical crack to plasterboard beside bedroom window — east wall. Photograph attached. Repair and redecorate.”
A strong inspection record normally includes:
- Location: room, level, elevation or other useful reference
- Description: what is wrong or what needs attention
- Evidence: photograph where useful
- Action: what needs to happen next
- Responsibility: person, subcontractor or trade
- Status: open, in progress, resolved or another appropriate status
- Date: when it was identified and, where relevant, when it was checked again
The aim is to make the issue understandable without requiring the inspector to explain it verbally later.
Use photographs as evidence
Photographs can make inspection records much clearer, particularly when a defect is difficult to describe in words.
Take photographs that show both the issue and enough surrounding context to identify where it is.
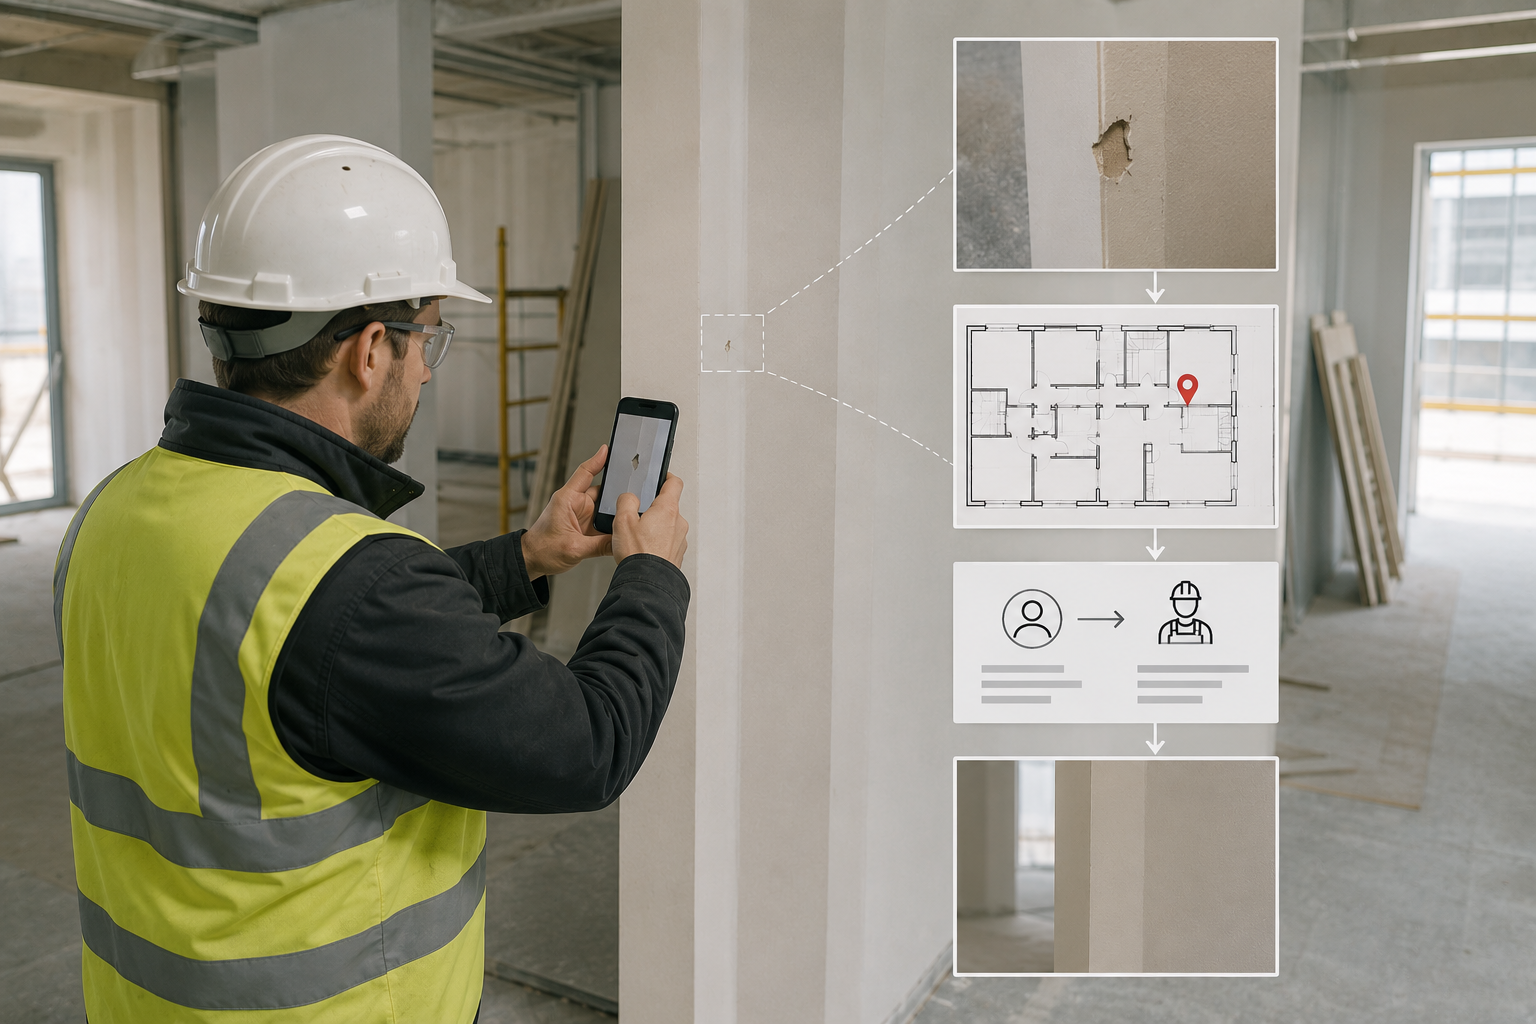
Photo evidence captured during a site inspection.
For example, a close-up image can show a damaged finish, while a wider image can show the room or location.
Where an issue is likely to be disputed or difficult to find later, consider adding visual markup to the photograph.
A useful photographic record should help answer:
- What is the defect?
- Where is it?
- What does the surrounding area look like?
- Has the issue changed?
- Has the repair been completed?
Do not rely on a phone gallery as the inspection record. The photograph needs to remain connected to the issue it documents.
Pin issues to the correct location
Location is one of the most useful pieces of inspection information.
“Defect in flat 12” may still leave a contractor searching around. “Bedroom 2, east wall, beside window” is much more actionable.
For larger projects, marking issues on a site plan or floor plan can make location clearer still.
A location-based inspection workflow can help teams:
- Find defects quickly
- Reduce ambiguity
- Assign work to the right area
- Revisit outstanding issues efficiently
- Compare findings during repeat inspections
This is particularly useful when several people are working across the same project.
Assign each issue to someone
Finding a defect is not the same as resolving it.
Once an issue has been recorded, establish who needs to take action.
Depending on the project, that might be:
- A subcontractor
- A specific trade
- A site supervisor
- A member of the internal team
- Another responsible party
The assignment should be clear enough that there is no uncertainty about ownership.
For example:
“Bedroom 2 east wall — damaged plasterboard beside window. Repair, fill and redecorate. Assigned to finishing team.”
This turns an observation into a manageable task.
Track issues after the inspection
One of the biggest weaknesses in a manual inspection workflow is the gap between finding an issue and confirming that it has been fixed.
A site inspection report might contain twenty findings, but the site manager still needs to know which ten are outstanding a week later.
For recurring inspections, track issues through a simple lifecycle:
Open → Assigned → In progress → Ready for inspection → Resolved
The exact statuses can vary by company, but the principle is the same: everyone should be able to see what still needs attention.
This is where defect tracking and inspection management overlap. The inspection identifies the issue; the follow-up workflow makes sure it does not disappear.
Verify that defects have actually been fixed
Do not close an issue simply because someone says it has been completed.
Where appropriate, revisit the issue and verify the result.
For example, if an inspection records a damaged door:
Original finding: Bedroom 3 door leaf scratched near handle.
Action: Replace or repair damaged finish.
Follow-up: Reinspect the door after the repair.
Closeout evidence: Updated photograph showing the completed repair.
This creates a much stronger inspection record than changing a spreadsheet cell from “open” to “closed” without evidence.
Create a useful site inspection report
A site inspection report should make the findings easy to understand and act on.
Depending on the type of inspection, it can include:
- Project details
- Inspection date
- Inspector
- Areas inspected
- Checklist or inspection criteria
- Findings
- Photographs
- Marked-up images where useful
- Location information
- Assigned responsibility
- Issue status
- Follow-up information
- Outstanding items
The report does not need to be unnecessarily complicated. A small construction company may benefit more from a clear, consistent report than from a large enterprise system containing features the team rarely uses.
Common site inspection mistakes
Writing notes that are too vague
“Paint issue” does not tell the person doing the work what needs to be corrected.
Record the location and describe the problem precisely.
Taking photographs without context
A close-up photograph can be difficult to locate later. Include enough context to establish where the issue is.
Keeping findings in separate places
If descriptions are in a notebook, photographs are on one phone, assignments are in WhatsApp and status is in Excel, the team has to reconstruct the inspection manually.
Keep the issue record and its supporting evidence connected.
Failing to assign responsibility
An unassigned defect is easy to overlook.
Make ownership part of the inspection workflow.
Closing issues without verification
A status change is not proof that the work is acceptable. Reinspect where appropriate and retain evidence of the result.
Treating every inspection as a one-off
Repeated inspections should build on previous records. Otherwise, site managers spend time recreating information they already have.
Paper, spreadsheets or digital inspection?
There is no single workflow that suits every project.
| Approach | Strengths | Limitations |
|---|---|---|
| Paper checklist | Simple and familiar | Photos, assignments and follow-up usually need separate handling |
| Spreadsheet | Flexible and inexpensive | Can become difficult to manage when issues, images and multiple users are involved |
| Messaging apps | Fast communication | Findings can become buried in conversations and are difficult to report consistently |
| Digital inspection software | Connects capture, evidence, location, assignment and reporting | Requires the team to adopt a consistent digital workflow |
For a small construction company, the best option is usually the simplest system that the team will actually use consistently.
When should a site manager use inspection software?
Digital inspection software becomes particularly useful when inspections are repeated across multiple areas, projects or teams.
Look for a workflow that makes it easy to:
- Capture issues quickly on a mobile device
- Add photo evidence
- Mark locations on a plan
- Assign issues to team members or trades
- Work offline where connectivity is poor
- Track issues through to completion
- Produce professional inspection reports
- Export reports in formats the office can use
Site Audit & Plan is designed around this type of workflow. A site manager can capture an issue on site, add photo evidence, pin its location, assign it and track it through to completion. The platform supports mobile and web use, offline functionality, photo markup, team collaboration and PDF/XLSX reporting.
The important point is not the software itself. It is having a repeatable inspection process in which the information captured on site remains useful after the inspection is over.
A simple site inspection checklist for site managers
Before finishing an inspection, check that you have covered:
- Correct project and area
- Relevant work or inspection criteria
- New defects and observations
- Previously reported issues
- Clear descriptions
- Accurate locations
- Photographic evidence where useful
- Marked-up photographs where useful
- Responsible person or trade
- Required action
- Current status
- Follow-up requirements
- Report or inspection record completed
Use the checklist as a control mechanism, not as a substitute for professional judgement.
How small construction companies can improve inspections
You do not need a complicated process to improve inspection quality.
Start with a few standards and apply them consistently:
Standardise how defects are described
Agree what information every finding should contain.
Use the same inspection route
Consistent routes make repeat inspections easier to compare.
Keep evidence with the issue
Photos, locations, descriptions and status should remain connected.
Make ownership visible
Every actionable issue should have a clear responsible person or trade.
Review outstanding items regularly
A short recurring review can prevent old defects from remaining open indefinitely.
Make reporting part of the workflow
Do not leave report creation until all inspection information has to be reconstructed from different sources.
Final thoughts
A good site inspection is not simply a walk around a construction project with a checklist.
It is a controlled process for identifying issues, recording useful evidence, assigning responsibility, following up and verifying completion.
For site managers and small construction companies, consistency matters more than complexity. If every finding has a clear description, location, evidence, owner and status, the inspection becomes much easier to manage from site through to closeout.
As projects become larger or inspections become more frequent, a digital inspection workflow can reduce the manual work involved in capturing, tracking and reporting those findings.