
Blog
Construction Defect Management Software: A Complete Guide
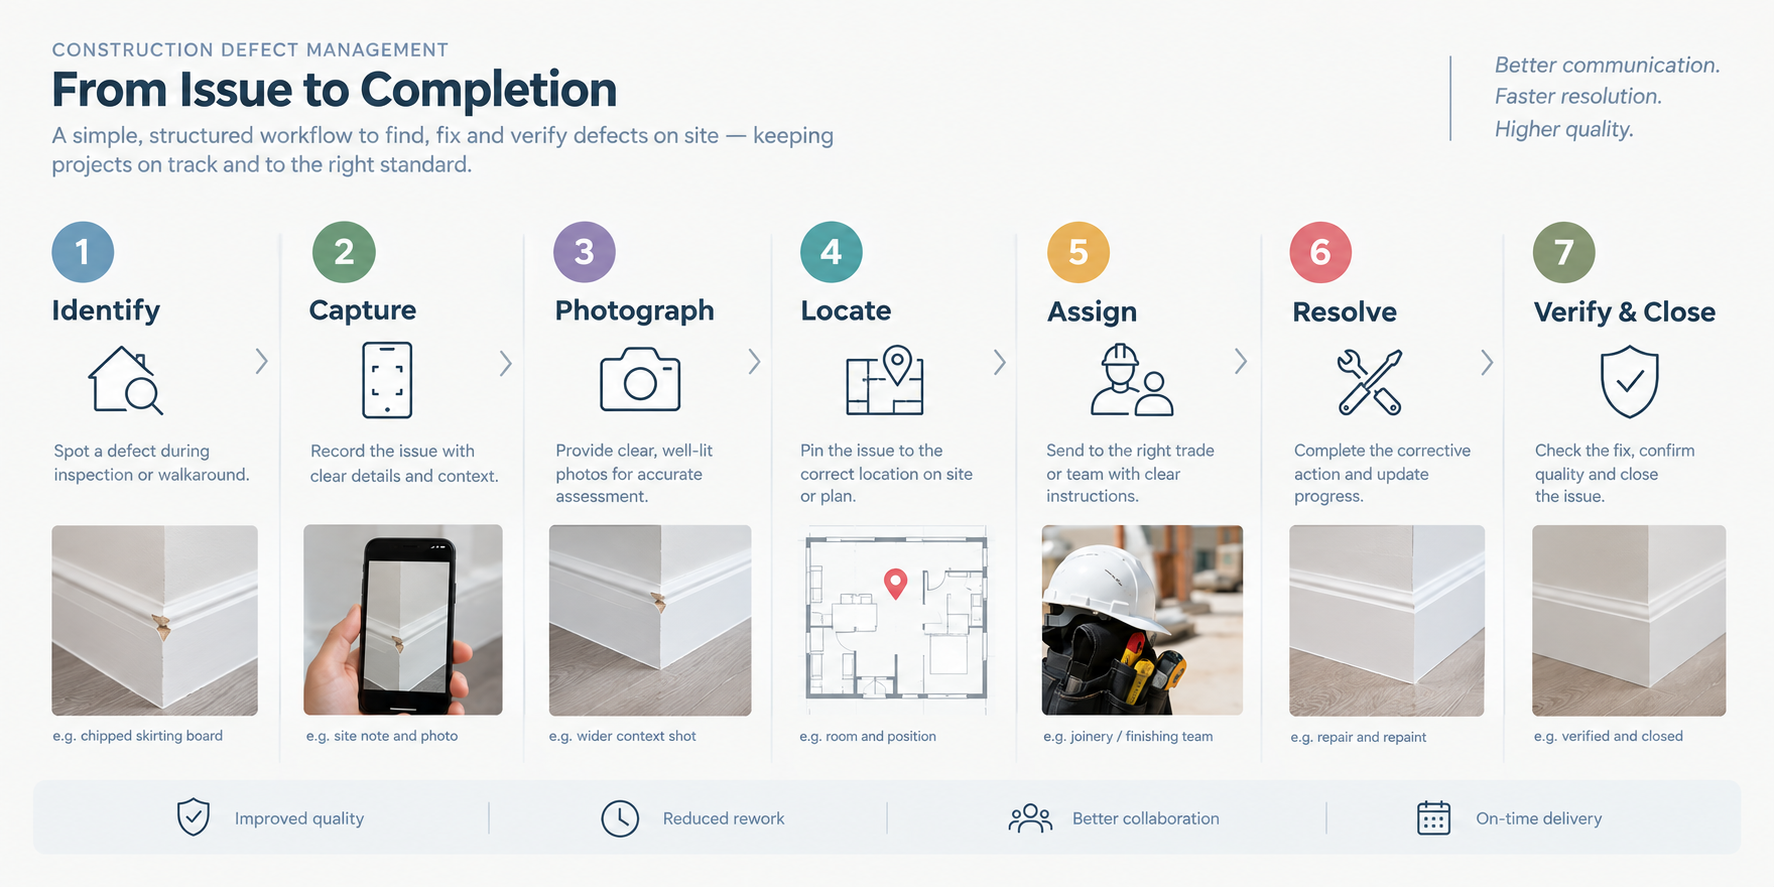
Construction defects are rarely difficult to identify because the problem is invisible. The harder problem is managing everything that happens after the issue is found.
A site manager may need to record a defect, photograph it, pinpoint its location, decide who is responsible, communicate the required corrective action, check progress, verify the repair and retain a clear record for handover or project closeout.
When defects are spread across paper lists, spreadsheets, photographs, emails and messaging apps, it becomes difficult to see what is still outstanding and who needs to act.
This is where defect management software can help. It gives construction teams a structured way to capture, document, assign, track and close defects throughout a project.
What is defect management software?
Defect management software is a digital system for recording and managing construction defects and other site issues.
Depending on the platform, a site manager can use it to:
- Capture defects directly from a phone or tablet
- Record a clear description of the issue
- Add photo evidence
- Mark the exact location on a site or floor plan
- Assign the defect to a responsible person, contractor or trade
- Record the required corrective action
- Track the issue towards completion
- Revisit outstanding defects during follow-up inspections
- Record evidence of resolution
- Produce professional reports for communication and handover
The terminology varies between markets. In the UK, teams commonly talk about snags, snagging lists and defects. International teams may use terms such as punch lists, punch list management or issue tracking. The underlying requirement is similar: create a reliable record of an issue and manage it until it has been resolved and verified.
Why do construction teams need defect management software?
A construction project can generate a large number of issues across different areas, stages and trades. A site manager might identify a damaged door during one inspection, incomplete sealant in another area, a plumbing issue during testing and a finishing defect during pre-handover checks.
The individual defects may be straightforward. Managing hundreds of them consistently is not.
A manual defect list can answer “what did we find?” but may not answer:
- Where exactly is the defect?
- What evidence was recorded?
- Who owns the corrective action?
- When was it assigned?
- Is the issue still outstanding?
- Has someone attempted the repair?
- Has the repair actually been verified?
- What evidence proves the issue was resolved?
- Which defects remain before handover?
- Can the site team produce a reliable record later?
Defect tracking software is designed around these questions. For a site manager, the value is not simply having a digital list. It is having a consistent defect management process that makes responsibility, progress and evidence easier to see.
What should defect management software do?
The most useful capabilities are those that reduce friction between finding an issue and closing it.
1. Fast defect capture
A defect should be easy to record while the site manager is still standing in front of it. A useful digital workflow allows the site manager to capture the issue immediately, while the location, description and evidence are fresh.
For example: Bedroom 3 — 450mm vertical crack to plasterboard beside the east-side window. That is more useful than “Crack in bedroom” because it gives the person receiving the task a clearer starting point.
2. Photo evidence
A written description is important, but photographs can provide supporting evidence. Good defect documentation may include a wider photograph showing context, a close photograph showing the defect itself, a marked-up photograph where an area needs highlighting, and before-and-after photographs where appropriate.
3. Location pins and plan markup
Location is one of the most important parts of a defect record. “Damaged skirting” does not tell a subcontractor which room, wall or section of the building is involved. A digital system can make location more explicit by allowing issues to be pinned to a plan or marked against a relevant area.
4. Assigning defects and issues
A defect list is only useful if somebody knows who is responsible for the next action. A leaking pipework connection may go to the plumbing team, a damaged door closer to the relevant door contractor, a failed light fitting to the electrical contractor and a finishing defect to the appropriate trade.
5. Status tracking
Construction defects do not move directly from “found” to “fixed”. A practical workflow may include:
Identified → Recorded → Assigned → In progress → Ready for inspection → Verified → Closed
The exact statuses can vary between projects. The important point is that a site manager should be able to distinguish between an issue that has been reported and an issue that has actually been resolved.
6. Defect documentation and audit trail
Defect management is also a documentation task. A useful record should show enough information to understand what happened without relying on someone’s memory.
- Date identified
- Location
- Description
- Photos
- Assigned person or trade
- Corrective action
- Status
- Follow-up inspection
- Resolution evidence
- Closure information
A practical construction defect management workflow
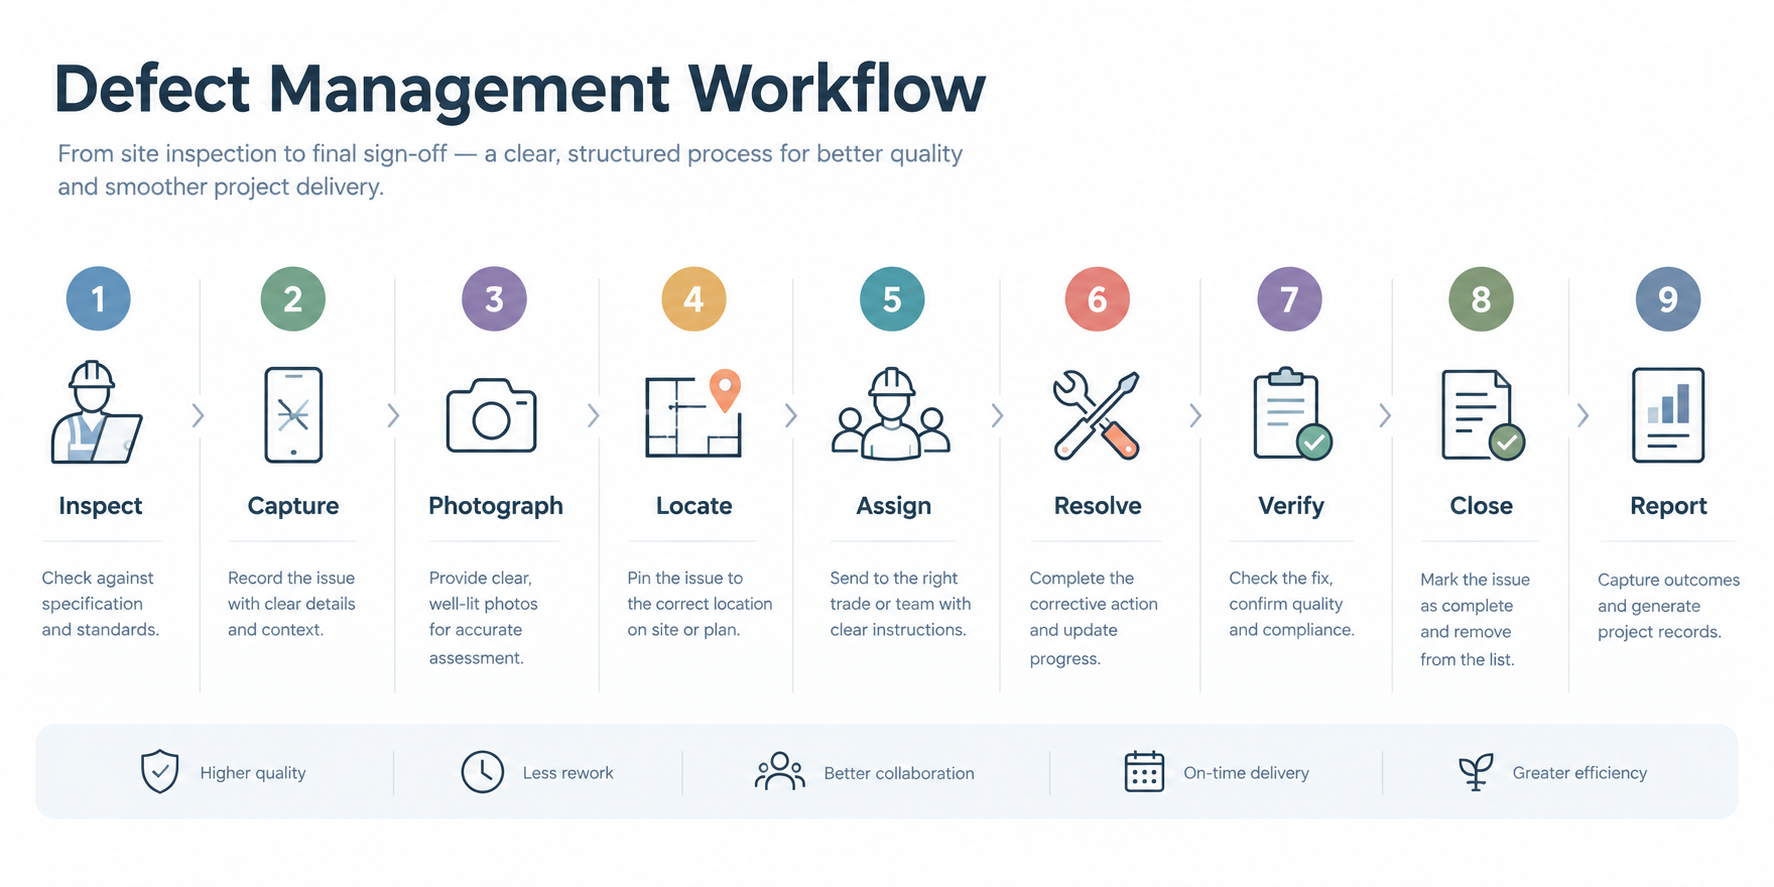
A connected defect workflow runs from inspection and capture through assignment, verification, closeout and reporting.
Step 1: Identify the defect
Find the issue during a site inspection, quality check, testing process, snagging inspection or follow-up visit. Record it as soon as practical.
Step 2: Describe the issue clearly
Write what is wrong rather than simply naming the object. Weak: “Window issue.” Better: “Bedroom 2 window handle does not engage fully when closed.”
Step 3: Add evidence
Take photographs that show the issue clearly. If useful, add a marked-up image to identify the precise area.
Step 4: Record the location
Pin the defect to the relevant plan, floor, room, unit or area where the software supports this.
Step 5: Assign responsibility
Assign the issue to the relevant person or trade. Where several parties are involved, make the next action clear rather than leaving responsibility ambiguous.
Step 6: Track corrective action
The responsible team completes the required work. The defect remains visible until there is evidence that the required action has been completed.
Step 7: Verify the resolution
The site manager or appropriate inspector checks the work. “Work completed” and “defect verified” are not necessarily the same event.
Step 8: Close the defect
Once the issue has been checked and accepted, close the record. Retain the information needed for project documentation and future reference.
What is the difference between defect tracking and defect management?
Defect tracking focuses on monitoring individual defects: where they are, what their status is, who owns them and whether they have been resolved.
Defect management is broader. It covers the process used to identify, document, assign, prioritise, resolve, verify and close defects across a project.
In practice, defect tracking is one part of defect management. A spreadsheet can support basic defect tracking, while a dedicated system can support a wider construction issue management workflow, including evidence, assignment, location, follow-up and reporting.
Defect management software vs spreadsheets
Spreadsheets are familiar and can be useful for simple lists. The problem appears when a project requires more than a list.
A spreadsheet may become difficult to maintain when a team needs to manage:
- Large numbers of defects
- Multiple trades
- Multiple buildings or units
- Photos and other evidence
- Exact site locations
- Repeated inspections
- Status changes and follow-up checks
- Project closeout
- Professional reporting
Defect management software brings more of those steps into a connected workflow. That does not mean every project needs specialist software. For a small, straightforward inspection, a simple list may be sufficient. The case for software becomes stronger when inspections are frequent, defect volume is high, several people are involved or reliable documentation is important.
How to choose defect management software for a site team
For site managers, the most useful evaluation is not a feature-count exercise. It is a workflow test.
Capture
Can a site manager record a defect quickly from a mobile device?
Evidence
Can the user add photographs and, where useful, mark them up?
Location
Can the issue be connected to the correct room, area, drawing or site plan?
Assignment
Can defects be assigned to the relevant person or team?
Tracking
Can the site team see outstanding defects and their current status?
Collaboration
Can information be shared between people working on site and in the office?
Offline working
Can inspections continue where site connectivity is unreliable?
Reporting and closeout
Can the system generate useful professional reports and retain enough information to understand how and when an issue was resolved?
Repeat inspections
Can the same workflow be used across multiple inspections and projects?
What should a good defect report contain?
A professional defect report should make an issue understandable to someone who was not present when it was discovered.
- Project name
- Building, block or site
- Date and time
- Inspector or person recording the issue
- Area, room or unit
- Exact location
- Defect description
- Photo evidence
- Required corrective action
- Assigned person or trade
- Priority where relevant
- Status
- Follow-up inspection information
- Resolution evidence
- Closure information
For example: “Apartment 204, Bedroom 2. Window handle does not fully engage with the locking mechanism when the sash is closed. Two photographs attached. Assigned to window contractor for adjustment. Reinspect after works.”
How defect management software supports construction handover
As handover approaches, outstanding defects become increasingly important. A site manager needs to know which items remain open, which are awaiting action and which have been completed but still require verification.
Structured defect tracking can support construction closeout because the team can work from records created during inspections rather than rebuilding a defect list at the end. Handover requirements vary by project, contract and client, so software should support the agreed process rather than replace it.
Common mistakes in construction defect management
Recording vague descriptions
“Damaged wall” is difficult to action. Describe the defect, location and relevant context.
Failing to capture evidence
A photograph taken later may not show the original condition clearly. Capture useful photo evidence when the defect is identified.
Assigning issues without clear ownership
If everyone assumes someone else is dealing with a defect, it can remain outstanding until closeout.
Closing defects too early
A contractor completing work is not necessarily the same as the site team verifying it.
Maintaining multiple competing lists
If the spreadsheet, paper list, messages and software all contain different versions of the defect list, the team may not know which one is current. Choose a clear system of record.
Treating every defect as the same priority
Some issues need immediate attention while others can be addressed as part of planned finishing works. Follow the project’s agreed approach to prioritisation and escalation.
Waiting until handover to organise defects
Defect management works better as an ongoing process than as a final-stage exercise.
When should a site manager use defect management software?
A digital defect workflow can be particularly useful when:
- The project has frequent inspections
- Multiple trades are involved
- There are many outstanding defects
- The same areas are inspected repeatedly
- Site and office teams need to share information
- Photo evidence is important
- Defects need to be assigned and followed up
- The project requires professional inspection records
- Handover and closeout documentation needs to be assembled from ongoing site activity
- The team works across multiple projects
For a one-off, very small inspection, a simple defect list may be adequate. For recurring construction inspections, the benefit is often the consistency of the workflow rather than simply replacing paper with an app.
How Site Audit & Plan can fit into a defect management workflow
Site Audit & Plan is designed for inspection, snagging and defect-management workflows where teams need to capture issues in the field and manage them through to completion.
It supports fast issue and defect capture, photo capture and markup, site-plan and location markup, location pins, assignment to users or team members, team collaboration, offline working, tracking issues through to completion, and professional PDF and XLSX/Excel reports.
The useful principle is the workflow:
Inspect → Capture → Photograph → Locate → Assign → Resolve → Verify → Report
For a site manager, this can provide a more connected approach to construction defect management than keeping separate lists for observations, photographs, responsibilities and closeout.
A simple defect management checklist for site managers
- Defects are captured at the point of inspection
- Every defect has a clear description
- The exact location is recorded
- Photo evidence is attached where useful
- Responsibility is assigned
- Corrective action is clear
- Outstanding defects can be reviewed
- Follow-up inspections are recorded
- Resolved defects are verified before closure
- The project retains useful inspection records
- Reports can be produced when required
- The same workflow can be repeated across inspections
- The team knows which system is the current record
Frequently asked questions
What is defect management software?
Defect management software is a digital system used to capture, document, assign, track, resolve and close construction defects and other site issues.
What is the difference between defect tracking and defect management?
Defect tracking focuses on monitoring individual issues and their status. Defect management covers the wider process, including identification, documentation, assignment, corrective action, verification and closeout.
Can defect management software replace a construction defect list?
It can replace or consolidate manual lists where the software supports the project’s required workflow. The main benefit is that the record can include evidence, location, responsibility, status and resolution information rather than only a line in a list.
Why is photo evidence important for construction defects?
Photos can show the condition and context of a defect when it was identified. They can support communication with the responsible trade and provide useful evidence during follow-up and closeout.
Should every construction defect be assigned to a subcontractor?
Responsibility should be clear for each actionable defect, but the appropriate assignee depends on the project’s organisation and contractual responsibilities. The important point is to avoid leaving ownership ambiguous.
Can defect management software work offline?
Some construction inspection and defect-management platforms support offline working. Site Audit & Plan includes offline functionality, which can be useful on sites where connectivity is unreliable.
What should a construction defect report include?
A useful report can include the project and location, defect description, photographs, assigned responsibility, corrective action, status, follow-up information and resolution or closure evidence.
Is defect management software useful for small construction teams?
It can be useful where a team carries out repeated inspections, manages several trades or needs consistent records. For a very small one-off inspection, a simple list may be sufficient.
Final takeaway
Good defect management is not simply about creating a longer defect list.
For a site manager, the goal is to create a reliable chain from discovery to resolution: capture the defect clearly, record the evidence, identify its location, assign responsibility, track the corrective action, verify the work and retain the record.
Defect management software can bring those steps together in one workflow, particularly for teams carrying out recurring inspections across busy construction projects.
The right system should make the work easier to manage without adding unnecessary administration. The most important capabilities are practical ones: fast capture, photo evidence, location information, assignment, tracking, collaboration, offline working and professional reporting.